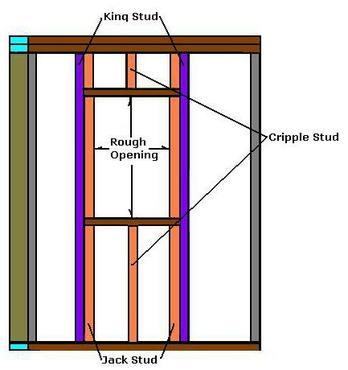
As you plan on installing your replacement windows, be aware that it fits into an opening in the wall framed with structural materials. This opening is called the rough opening. The rough opening is typically 1/2 inch larger than the overall window unit size on each side. The header is a structural member that spans the rough opening and carries any load above the window to relieve pressure from the ceiling joists or second floor joists. A second wall stud called jack stud or trimmer stud is on each side. A double sill forms from the bottom of the rough opening. Your last for of support is the extra stud on the outside of the jack studs (king stud in image on the right).
Changing the Size of the Window
If the replacement window is to be smaller or larger than the window it is replacing, the framing for the rough opening will have to be altered. The size of the rough opening depends upon the replacement window size. Manufacturers specify the rough-opening size for each window.
Adjusting For a Smaller Window
Begin by removing the old window and frame, exposing the existing frame of the rough opening. This will include removing the interior window casing and possibly exterior molding around the window or sometimes some of the siding. Next, install studs and a sill in the rough opening. If you want to lower the window, frame a member below the header.
Adjusting For a Larger Window
The framing for a larger window is more difficult. Since the width of the rough opening is larger than the existing header, a new longer header is required. Since the old header is supporting a overhead ceiling or floor, this weight must be supported before the old header is removed. This can be done by installing a temporary partition below the ceiling joists. Make certain the floor is strong enough to carry the load.
Under normal conditions the bottom plate on the temporary partition will spread the load over several floor joists. If there is any doubt about the strength of the floor joists, install a temporary beam below the floor. It can be supported on concrete blocks laid without mortar. It is also possibly that the temporary partition may cause minor damage to the ceiling material, so repairs may be necessary. You might pad the top plate with a piece of carpet.
After a temporary beam has been positioned on concrete blocks and any necessary shimming for support below the floor and the temporary partition as needed, has been put in place, you are ready to remove the old header as well asn any unneeded studs. This will involve cutting away drywall on the interior wall and cutting black the exterior siding. Careful measurement is important so that too much material is not cut away. If this happens, it will require some extra patching after the window is in place. Next frame the new rough opening as explained above. Always have a stud or crippple every 16 inches on center so you can install your drywall. Because the opening to be spanned is larger than the original, consider the size of the new header.
To install the replacement window, make sure that you follow the manufacturer's directions. Procedures vary depending upon the type of window to be installed as well as upon the brand of window to be used. Most replacement windows are designed so that they can be installed form the inside of the wall.
 RSS Feed